Wanna turn your wall into the ultimate rhythm-powered punching arena? Get a music boxing machine, and once it’s up, you’re just moments away from epic workouts and lightning-fast reflex drills.
It’s easy to set up, connects to your music, and offers a great way to challenge yourself with different modes and difficulty levels. So, punch your way to better fitness while having a blast!
Table of Contents
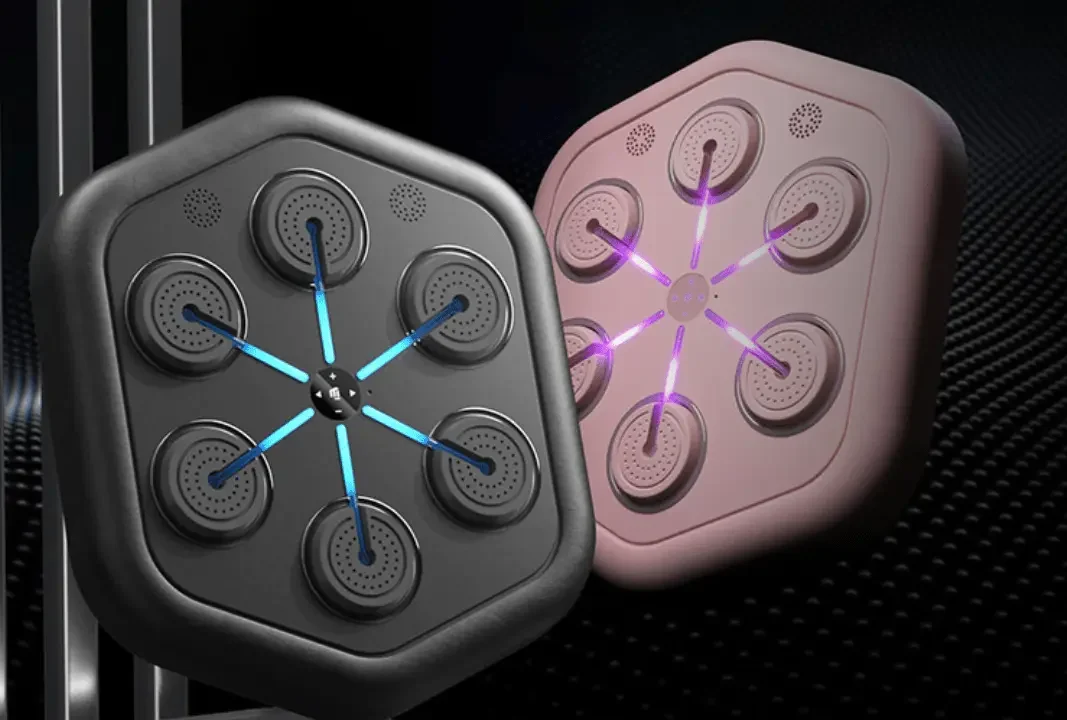
What is the Musical Boxing Machine?
The musical boxing machine is a training tool you can use to improve your boxing skills and physical coordination. It uses light-guided targets that react to sound signals, and you can punch in sync with the rhythm of music. You can use it if you want to work on hand-eye coordination, offensive and defensive reflexes, or just get a fun workout in.
How Does It Work?
The concept behind the musical boxing machine is to punch the glowing targets as they light up, and you’ll get feedback on your strikes. It can improve your speed and accuracy over time.
The system uses adjustable speed and difficulty settings to match your skill level. You can start slow and work your way up as your reaction time and overall coordination improve. The Bluetooth feature helps you sync it with your music for an even more immersive experience.
How to Install Your Music Boxing Machine
You can install it on any solid wall surface like wall, wood, or tile. Peel off the adhesive backing on the provided Velcro strips and stick the machine to the wall. The setup is usually adjustable. You can even change the height based on your preferences.
Critical Pre-Installation Checks
1. Wall Type Suitability
The ideal wall types are solid concrete, brick, or wooden studs behind drywall. These surfaces provide the necessary support for mounting.
You should avoid installing on hollow plasterboard without anchors, weak drywall, or glass surfaces. Mounting on these can lead to instability and potential damage.
2. Clear Surrounding Space
Maintain a minimum of 3-4 feet of clear space around the machine. It helps with unrestricted movement during workouts and reduces the risk of accidental collisions.
Installation Options
You can mount the musical boxing machine on the wall in various ways. Here are the popular ones:
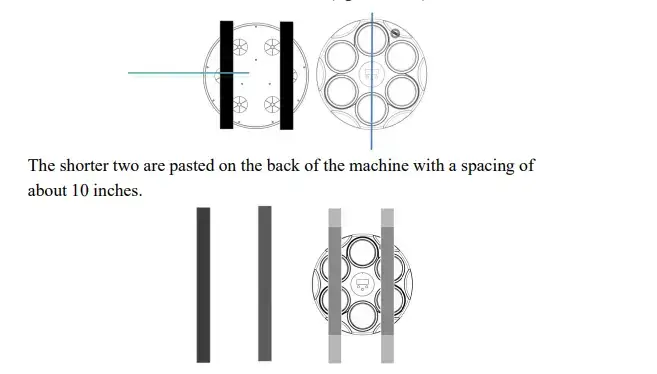
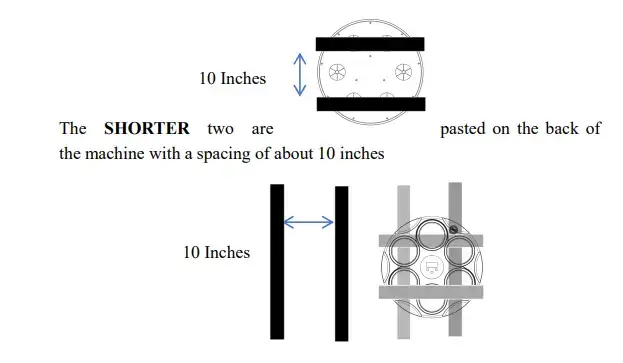
Method 1: Movable Installation with Velcro
This approach allows you to adjust the height of the machine as needed.
- Prepare the machine and lay the boxing target flat on a table.
- Remove the backing from the two shorter Velcro strips.
- Attach them to the center of the back of the machine, and space them approximately 10 inches apart.
- For the wall, remove the backing from the two longer Velcro strips.
- Stick them vertically on the wall, so that they are spaced about 10 inches apart.
Mount the Machine
- Align the shorter Velcro strips on the machine with the longer strips on the wall.
- Press firmly to secure the machine in place.
Note: This method offers easy repositioning of the machine. It is good for households with multiple users or for those who prefer flexibility in their setup.
Method 2: Fixed Installation with Adhesive
For a more permanent setup, consider using the built-in adhesive.
- Peel off the protective film from the adhesive on the back of the machine.
- Clean the wall surface to ensure it is smooth and free from dust or moisture.
- Align the machine at the desired height.
- Press the adhesive side firmly against the wall and hold for a few seconds to ensure a strong bond.
Important: This method is intended for long-term installation. Avoid removing and reattaching the machine frequently, as this can weaken the adhesive.

Method 3: Secure Installation with Wall Anchors
If you want maximum stability when working the target, fasten your music boxing machine directly into the wall with anchors. It eliminates sagging or accidents from the machine pulling away even after repeated impact.
You’ll need stud finder, drill, with appropriately sized bit, wall anchors (plastic or metal, rated for at least 20 lbs), matching screws, and level.
- Locate two studs vertically spaced about 10 inches apart, using a stud finder.
- Hold the machine up where you want it (use a level to keep it straight) and mark the center of each mounting hole.
- Drill a pilot hole at each mark. Size it to match your anchors (e.g., ⅜″ for standard plastic anchors).
- Gently tap each anchor into its hole until it’s flush with the wall surface.
- Align the machine’s mounting holes over the installed anchors.
- Drive screws through the machine’s backplate and into the anchors until snug (don’t overtighten or you risk crushing the anchor).
- Give the machine a firm tug to make sure it’s rock‑solid. If there’s any movement, tighten the screws a bit more or upgrade to a stronger anchor.
This is the most permanent and secure installation option. It’s great for gyms, studios, or during high‑intensity exercise.
Select the Optimal Height
The center of the machine should be at eye level when standing. The height is generally comfortable for most users.
If the machine will be used by individuals of varying heights, you can consider adjustable mounting options or select a height that accommodates the majority.
Key Features of the Musical Boxing Machine
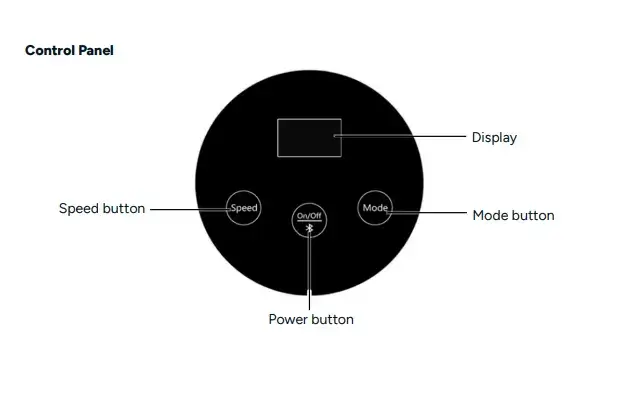
1. Bluetooth Connectivity
- Activate Bluetooth on the Machine: Press and hold the left button (LOOP) until you hear “Bluetooth Mode.”
- Enable Bluetooth on Your Smartphone: Go to your phone’s Bluetooth settings.
- Select the Machine: Look for a device named “Bluetooth” or similar and tap to connect.
- Confirmation: Once connected, you may hear a confirmation sound.
You can easily connect your phone or wireless speakers to play your favorite music while you train. The machine works with any Bluetooth-enabled device.
2. Adjust Speed, Modes, and Settings
You can adjust the speed and difficulty of the flashing targets, and it can improve your reaction time. There are 9 different levels of speed and 9 different modes to choose from. So you can keep things interesting and challenge yourself as you progress.
Strike Speed and Light Mode
- Use the left button (LOOP) to control how fast the lights flash. Tap it repeatedly and the speed will increase gradually through levels H01 to H09.
- The right button (MODE) changes the pattern of how the lights flash. Each tap cycles through modes P01 to P09, offering different training challenges.
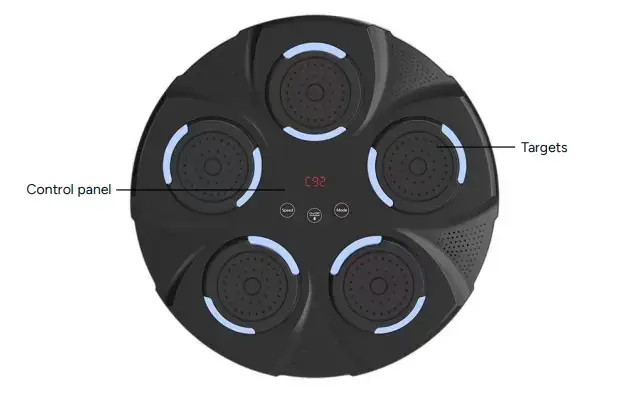
Track Your Performance
The machine tracks your progress, counting the number of successful punches you’ve thrown, the total strikes, and even your exercise duration. This feature helps you monitor improvements and set goals.
You can monitor by using the center (power) button. Be sure the device is powered on first.
- One press: Displays CXXX, and shows your number of correct, consecutive punches. If you miss, the count resets.
- Two presses: Displays FXXX, which is your total punch count.
- Three presses: Displays XX.XX, and shows how long you’ve been exercising.
The machine features reactive light targets that guide your punches. Different light patterns correspond to various workout modes, such as freestyle, challenge, and rhythm.
3. Music Synchronization Capabilities
The machine syncs with music playback from the app or connected device. Adjust the volume and beat synchronization to match your workout intensity.
To control the volume:
- After turning the device on, press the center button four times. You’ll see a volume indicator like UXX (ranges from U00 to U30).
- Tap the LOOP button to decrease volume.
- Tap the MODE button to increase volume.
- Press the power button once more to confirm and save your volume setting.
The device has easy-to-use buttons for controlling power, Bluetooth, speed, modes, and volume. You can quickly adjust the settings to match your mood or skill level.
Power Up Your Musical Boxing Machine
1. Connect to Power
- Plug in the Power Adapter: Use the provided USB-C cable to connect the machine to a USB power source, such as a 5V/1A-2A charger.
- Power On the Machine: Press and hold the power button until the display lights up, indicating the machine is powered on.
- Charging Status: If the battery is low, the display will show “FUL” once fully charged.
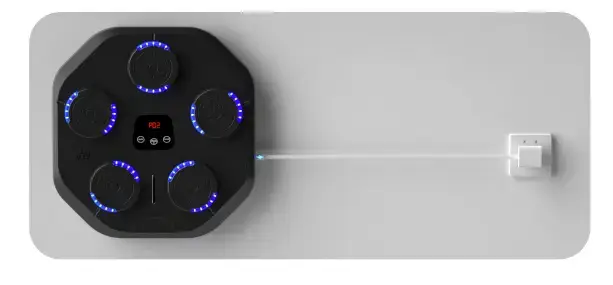
2. Initial Setup
- Sound Test: When you power it on, the machine may play a test sound.
- Adjust Volume: If needed, adjust the volume by pressing and holding the volume buttons.
Important Usage Tips
The device is fun and effective for training, there are some safety precautions to keep in mind:
- Avoid using it right after meals: Wait at least 30 minutes before you start training to avoid any discomfort.
- Not for everyone: If you’re pregnant, menstruating, or not feeling well, it’s best to skip the workout.
- Battery Care: Charge the machine when the battery runs low to prevent damage and keep it working efficiently.
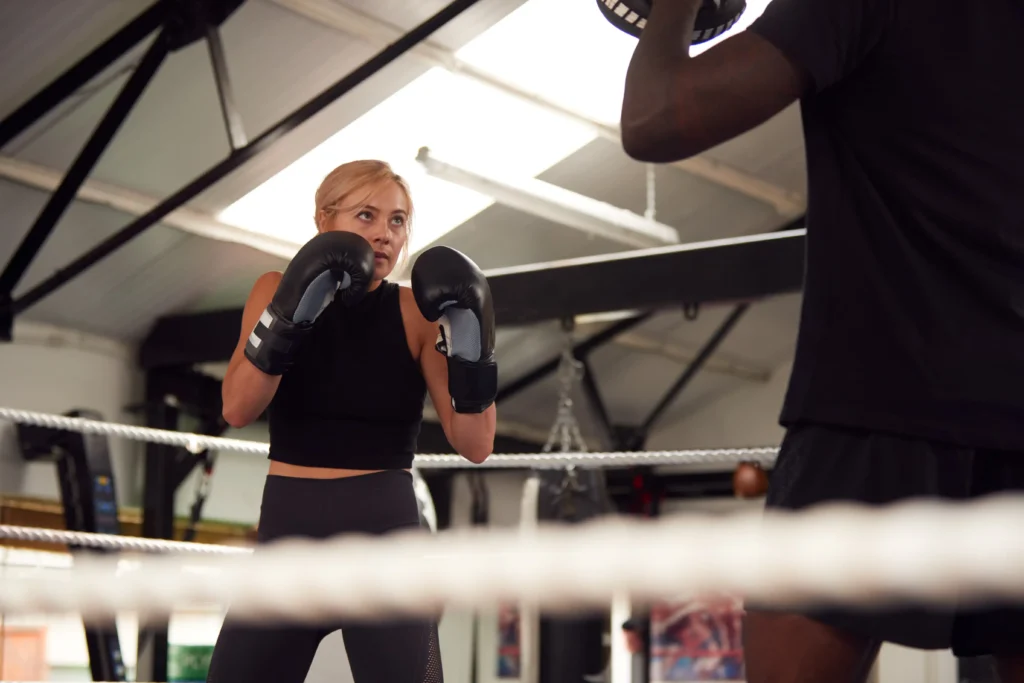
- Wear Gloves: It’s recommended to wear boxing gloves while using the device to avoid injury and make the experience more comfortable.
- No Disassembling: Don’t attempt to take the device apart, as this could void the warranty and cause damage.
Master the Basic Punching Techniques
Before you start, understand the fundamental punches and proper form.
1. Proper Punching Technique
- Stance: Stand with your feet shoulder-width apart, knees slightly bent. Keep your hands up to protect your face.
- Jab: Extend your lead hand straight out, rotate your fist so the palm faces downward upon impact.
- Cross: From your guard position, rotate your body and throw a straight punch with your rear hand.
- Hook: Swing your lead arm horizontally, and keep your elbow bent at a 90-degree angle.
- Uppercut: Bend your knees slightly and drive your rear fist upward, and aim for the opponent’s chin.
2. Rhythm and Timing
- Sync with Music: Align your punches with the beats or light cues from the machine.
- Build Speed and Accuracy: Start slow to master the moves, then increase speed and maintain precision.
Maximize Your Workout
To get the most out of your sessions:
- Incorporate Cardio: Alternate between high-intensity bursts and active rest periods.
- Reflex Training: React quickly to changing light patterns to improve hand-eye coordination.
- Stress Relief: Use the rhythmic punching to release tension and boost mood.
Quick Workout Routines
Here are some mini-workouts to try:
1. 5-Minute Quick Burn
- 30 seconds of jabs
- 30 seconds of hooks
- 30 seconds of uppercuts
- 30 seconds rest
Repeat this cycle for 5 minutes.
2. Reflex Builder Drill
- 1 minute of freestyle punching
- 30 seconds of rapid jabs
- 1 minute of alternating hooks and uppercuts
- 30 seconds rest
Repeat for 10 minutes.
3. Freestyle Flow Session
- Play your favorite upbeat music.
- Punch along with the rhythm, incorporating all punch types.
- Focus on fluid movements and enjoying the process.
Protecting Your Hands and Wrists
To prevent injury:
- Hand Wraps: Wrap your hands before each session to support your wrists and knuckles.
- Boxing Gloves: Wear padded gloves to cushion impacts and protect your hands.
Expert Tip: For beginners, 12-16 oz gloves are recommended for adequate protection.
FAQs
Can I Install My Machine on Drywall?
Mounting directly onto drywall is not recommended. Drywall alone may not provide the necessary support, and it may lead to potential damage or the machine falling off.
My Lights Aren’t Syncing with the Music. What’s Wrong?
If the lights aren’t syncing properly, try the following steps:
Check Bluetooth Connection: Check your smartphone or tablet is properly connected to the machine via Bluetooth.
Inspect Music Source: The music source (e.g., streaming app) should play correctly and is not paused or muted.
Restart Devices: Turn off both the machine and your smartphone/tablet, then power them back on and reconnect.
How Often Should I Clean the Pads?
To maintain hygiene and optimal performance:
After Intense Sessions: Wipe down the punching pads with a damp cloth to remove sweat and dirt.
Weekly Maintenance: For light use, clean the pads weekly to prevent buildup.
Can Children Use the Music Boxing Machine?
Yes, with proper supervision and precautions:
Age Appropriateness: Check the machine is suitable for the child’s age and physical capabilities.
Supervision: Always supervise children during use for safety.
Safety Gear: Equip children with appropriate safety gear, such as gloves, to prevent injuries.
Adjust Settings: Set the machine to a lower intensity and speed suitable for children.
Summing Up
The music boxing machine offers a dynamic and exciting way to train. A professional boxer can improve your reflexes or just someone wanting a fun way to get fit can utilize it. Follow the beat of the music and react to light signals, you’ll work up a sweat while sharpening your boxing skills. It’s also a great way to switch up your usual workout routine!
