Key Takeaways
- A hook is not an arm swing. The foot turns first, the hip follows, and the fist lands last.
- Keep the wrist straight at impact. A bent wrist sends force into the small bones of the hand.
- The elbow and fist should stay on the same line. If the elbow drops, the punch loses structure.
- Your other hand stays at your cheek. Dropping it makes the hook easier to counter.
- Start with the body hook before loading head hooks on the bag or in sparring.
- Train the hook slowly first. Speed and power only matter when the shape is clean.
- Stop if you feel sharp wrist, hand, or shoulder pain. It is not normal training fatigue.
A good hook starts in your stance, moves through your feet and hips, then finishes with a tight fist and a guarded chin. That is why the punch feels awkward for many beginners.
When one link breaks, the whole shot suffers. Your wrist bends, your shoulder takes the load, your balance shifts too far forward, or your opposite hand drifts away from your face.
Here, I will keep the hook simple. You will learn how to set your feet, turn without falling in, keep your elbow and wrist in line, and bring your hand back before you admire the punch.
I will also connect each mistake to what you feel in your body, so pain and balance problems are easier to fix. Let’s start!
Table of Contents
Wrap, Warm Up, and Protect Your Hands
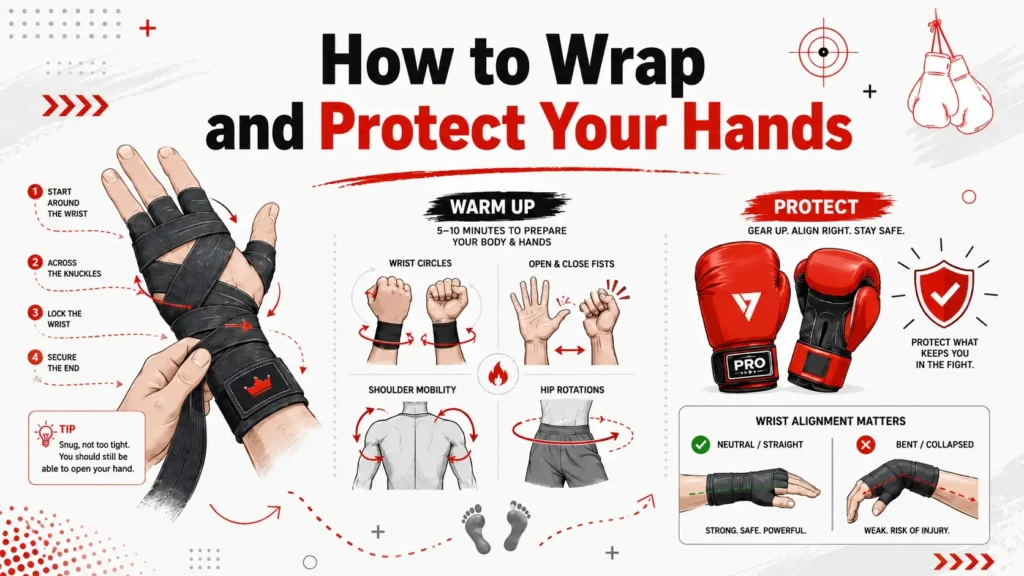
Before you drill hooks, protect the small parts that take the hit first. Start with a clean hand wrap. Hook the thumb loop, cover the knuckles with even layers, pass the wrap between the fingers to stop the knuckles from spreading, then finish by locking the wrist. Your fist should close fully. The wrap should feel firm, not numb or tingly.
Now warm up for four minutes. Circle the wrists, open and close your fists, roll the shoulders slowly, then turn the hips in and out while standing or sitting. Warm joints before fast rotation. Cold shoulders and stiff hips make you swing with the arm, which is exactly what strains the wrist and shoulder.
For solo practice, set a mirror at side angle and film from behind. Check the rear-foot pivot, hip turn, and if your hand returns to guard.
Stance, Guard, and Balance Baseline
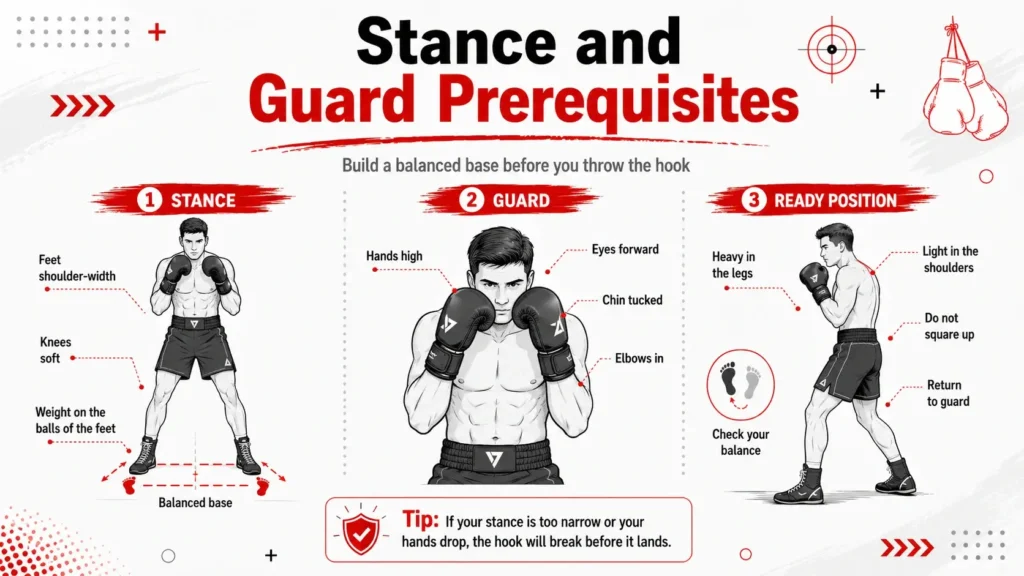
Your hook starts before your hand moves. Stand with your feet about shoulder-width apart, or a little wider if you feel shaky. Keep your knees soft, pointed in the same direction as your toes, and let your weight sit on the balls of your feet. Your heels can stay light, but do not bounce. You need a base you can turn from, not a pose you have to save.
Keep your chin tucked and look forward under your brow. Both hands stay high. The punching elbow can lift, but it should not swing so far out that your shoulder feels pinched. Your other hand stays near your cheekbone or temple. If it drops to your ribs, you are using it for balance instead of defense.
If you fall forward after the punch, that is not power. It is lost control.
The Mechanical Breakdown of Hook
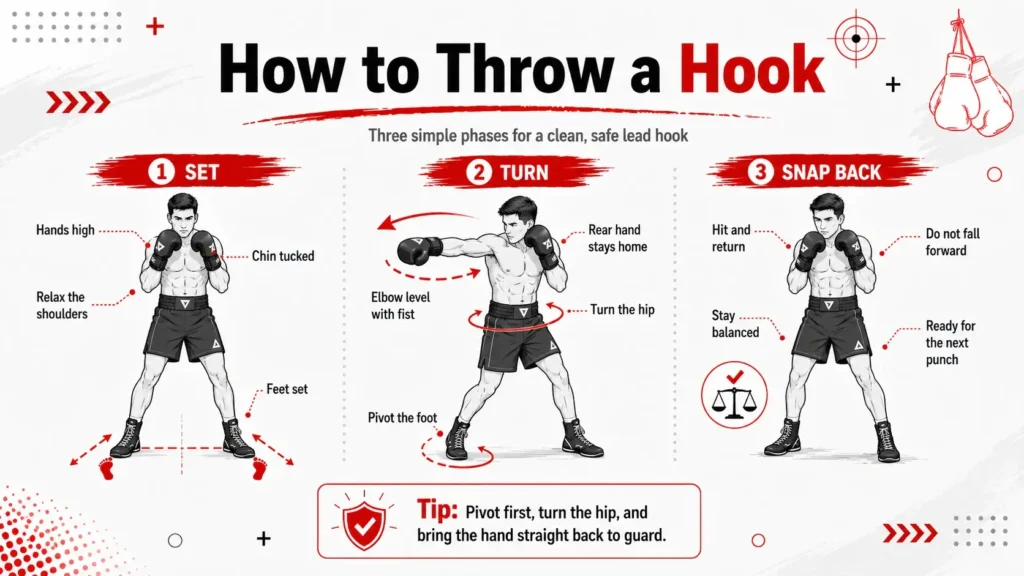
1. Start With the Rear Foot
A hook is built from the ground up. Feel the ball of your rear foot press into the floor, especially near the big toe. The heel should lift because the foot is turning, not because you are hopping. Think of the rear ankle starting the turn, then the knee and hip following it.
If the foot does not pivot, your hip gets stuck. When the hip gets stuck, the shoulder tries to force the punch. That is where many beginners feel pinching, tightness, or early fatigue.
2. Turn the Knee and Hip Together
As the rear foot turns, let the rear knee travel with it. Do not let the knee cave inward while the hip stays behind. Your belt buckle should rotate toward the target line, not upward like you are standing out of a squat.
A weak hook steps forward and pushes. A clean hook turns through a short circle. The second one is faster, safer, and harder to read.
3. Let the Torso Carry the Force
Brace your abs like you are about to take a light body shot. Then let the shoulder follow the hip. Do not throw the shoulder first. Your torso only needs enough turn to send the punch, usually about a quarter turn from your starting stance. If you spin too far, your back starts to show and your guard breaks.
4. Keep the Arm Tight
Lift the elbow near shoulder height and keep the forearm close to level. The arm should move like a door hinge, not a golf swing. If the elbow drops, the fist drops with it, and your chin is open.
5. Stack the Fist and Breathe
At contact, keep the wrist straight and the knuckles lined up. Some coaches teach palm down; others teach a vertical fist for close hooks. Both can work, but a bent wrist cannot.
Exhale sharply on impact with your jaw closed around the mouthguard. It helps brace the body and keeps your mouth from hanging open.
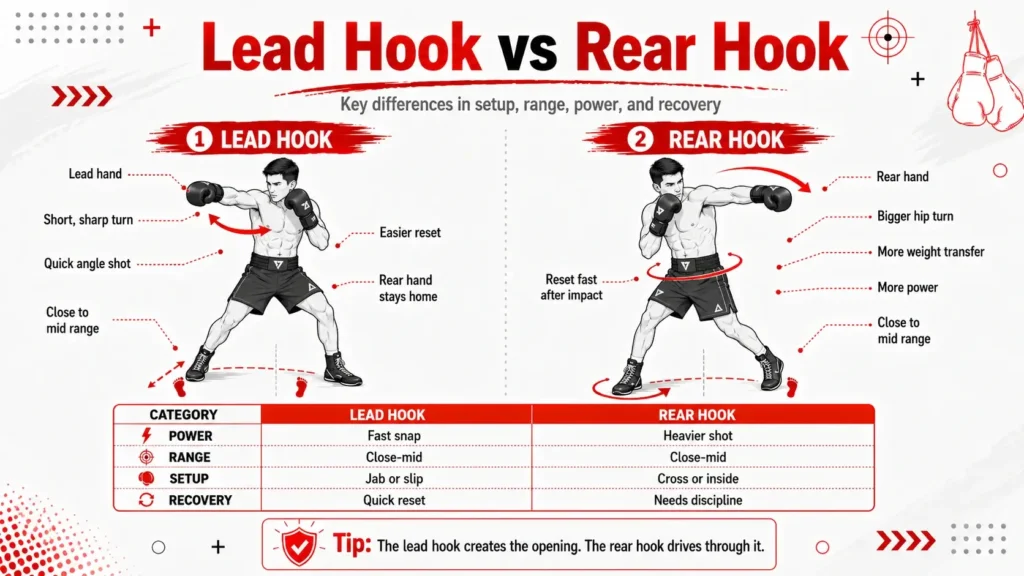
Lead Hook vs. Rear Hook: Technical Comparison
The lead hook and rear hook look similar, but they do different jobs. For an orthodox boxer, the lead hook is usually the left hook. It is shorter, quicker, and easier to use after a jab, slip, or small angle change. The rear hook is usually the right hook. It travels farther, carries more body mass, and needs cleaner recovery.
For southpaw boxers, reverse the sides. Your lead hook comes from the right hand, and your rear hook comes from the left. Learn more about southpaw boxing here.
| Attribute | Lead Hook, Orthodox Left | Rear Hook, Orthodox Right |
|---|---|---|
| Starting weight | Near even, or slightly on lead side after setup | Often starts with more load on rear side |
| Main foot pivot | Lead foot turns on the ball | Rear foot turns on the ball |
| Hip action | Short, quick turn | Larger turn with more commitment |
| Best range | Short to mid range | Mid to close range |
| Common setup | Jab, inside slip, feint, lead uppercut | Cross, body shot, pivot, inside exchange |
| Power source | Speed, timing, angle | Weight shift, hip turn, trunk rotation |
| Main risk | Elbow drops, chin opens | Over-turning, slow return to guard |
| Recovery | Easier to reset to center | Needs a sharp reset or defensive exit |
Range and Setup Differences
The lead hook is great when you are already close or when the other boxer is moving into your space. A common example is jab, slight inside slip, lead hook. The punch does not need a big wind-up. It works because it comes from a short path and catches the side angle.
The rear hook is more useful after you have closed distance. For example, cross, step in, rear hook. It can work to the head or body, but because it carries more rotation, you cannot admire it after contact.
Weight and Recovery
After a lead hook, your weight should settle close to center so you can jab, pivot, or block. After a rear hook, your weight often moves forward, so you need to reclaim your stance. That can mean a small step, a pivot, a roll, or a quick return to guard.
The lead hook creates the angle. The rear hook uses the opening. Both only work if your feet are ready before your hand fires.
Short Hook vs. Long Hook
A short hook is the beginner’s best friend.
The elbow is bent close to 90 degrees or tighter. The fist may travel only a few inches. This is the hook you use in close, on the body, or when the bag is already near you.
A long hook has a wider arc. The elbow opens more. It can catch someone moving away, but it also tempts you to reach. Reaching breaks balance. It also exposes the chin.
Learn the short hook first. The shorter the arc, the less time your guard is open.
Why Your Hook Feels Weak
Your hook feels weak because you are trying to throw it with the shoulder.
Relax first. Tension before launch slows the punch and gives away the shot. The body should stay loose until the moment of impact. Then the fist closes hard, the abs brace, and the breath snaps out.
There is a difference between swinging and snapping. Swinging feels big. Snapping feels sharp. A swing pulls you off line, while snap returns home.
Hook Variations by Range and Target
Body Hook
Start here. A body hook is safer for beginners because the target is lower, the arc is shorter, and you learn to stay compact.
Bend the knees to change level. Do not fold at the waist. Keep your back strong, eyes forward, and guard high. The hook should land to the ribs or body line, then return.
Inside sparring, body hooks also reduce the risk of clashing heads compared with careless head hooks.
Short Hook
The short hook is for tight space. Elbow close. Fist short. Hip quick.
Use it when you are close enough that a straight punch would jam. The elbow should not fly behind you. Keep it connected to the ribs, then let it open only as much as needed.
Mid-Range Hook
This is the hook most beginners try first. It needs a full pivot, but not a lunge.
Use the bag to check distance. If you need to fall forward to reach, you are too far away. Step first, then hook.
Long Hook
The long hook is not a beginner staple. It works when the other boxer is backing out or leaving the side open, but it punishes lazy balance.
Use it lightly in practice. Keep the chin tucked and recover right away.
Check Hook
The check hook is a counter for forward pressure. You let the other boxer step in, hook as you shift back or pivot out, then leave the line.
Do not rush this in live work.
Practice the footwork alone first. Add the punch later. Use it in sparring only with a coach present.
Common Mistakes and Fixes
Telegraphing the Hook
If your hand drops before the punch, you have told the other person what is coming.
Do not load from the hip. Do not dip the shoulder, and never pull the hand back.
Start from the chin, stay relaxed, turn and fire.
The Chicken Wing
It is when the elbow flares too early and too wide. It makes the hook slow, opens your chin, and weakens the wrist line.
Self-check: if you can see your elbow clearly before the punch lands, it is probably too wide.
Keep the elbow near the body at the start. Lift it only as the punch travels.
Arm Punching
Shoulder fatigue is a clue. If your shoulder burns but your legs and core feel asleep, you are arm-punching.
Try this drill. Put both hands on your chest. Throw the hook with only the foot and hip turn. No arms. Feel the rotation first. Then add the arm path at half speed.
Falling Forward
Power does not mean falling.
After the hook, you should be balanced enough to throw again, block, pivot, or step out. If your head passes your lead knee, reset your distance and shorten the arc.
Dropping the Other Hand
This is the mistake that gets beginners tagged.
On a lead hook, the rear hand protects the right side of your face. On a rear hook, the lead hand protects the left side. Keep it there.
Solo Training Drills and Progressions
Mirror Shadowboxing
Stand side-on to a mirror. Throw the hook slowly. Watch the order.
Foot first. Hip second. Shoulder third. Fist last.
Now freeze at the end. Check your chin, rear hand, elbow level, and balance.
Film from hip height to see the pivot. Film from face height to see the guard.
The 30-Day Hook Plan
Week 1: Pivot only. Hands stay on your cheeks. Turn the foot and hip without punching.
Week 2: Add the elbow path. Move slowly. Stop if the wrist bends.
Week 3: Add full shadowboxing hooks. Keep power at 30 percent. Run the mirror checks daily.
Week 4: Add the heavy bag. Touch first, then snap. Wrap your hands. Wear proper gloves. Start light.
Twenty clean hooks beat one hundred sloppy ones.
Heavy Bag Range Drill
Stand close enough to touch the bag with a bent elbow. Tap the target first. Then throw the hook. If you have to reach, step in before punching. Do not solve distance with your shoulder.
Band Drill
Anchor a light band around waist height. Hold it with both hands and rotate slowly. Keep the knees soft and the ribs down. It trains control through the trunk without guessing.
Double-End Bag Drill
A double-end bag gives honest feedback. If your hook is wide, you miss. If your guard drops, the bag comes back at you.
Keep the shots light. Use it for timing, not power.
Balance Pad Drill
Stand in stance on a soft pad or balance disc. Throw slow hooks without impact. If the ankle wobbles or the knee caves, slow down.
Recommended Training Tools for Solo Practice
You do not need a full gym to build the hook. You do need safe basics.
Use 180-inch hand wraps for wrist and knuckle support. Use 16 oz or 18 oz training gloves for bag work if they fit your hand and your coach agrees. Use a mirror or phone tripod for feedback. Use a heavy bag for distance and impact only after the motion is clean.
Helpful add-ons include light resistance bands, a double-end bag, and a balance pad.
Safety Protocols and Injury Prevention
Wrist Alignment
The fist should land with the wrist straight. Not bent back. Not folded inward. Not tilted toward the pinky side.
Aim to land through the first two knuckles when the angle allows it. Keep the knuckles, wrist, and forearm stacked. If the wrist bends, stop hitting hard.
Wraps for Hook Support
A good wrap supports the thumb, pads the knuckles, and locks the wrist.
It should feel firm, not numb. You should be able to close your fist fully. There should be no loose fabric inside the glove.
Load Management
Beginners do not need high volume. They need clean reps.
Start with light shadowboxing. Then light bag taps. Then short rounds. If your form gets worse, the round is over.
Red-Flag Pain
Muscle fatigue is normal. Sharp joint pain is not.
Stop if you feel sharp wrist pain, repeated shoulder pinching, numbness, tingling, or hand pain that changes your punch. Ask a coach or sports medicine professional to check you before you keep loading the punch.
Do not train through joint pain.
Why Beginners Should Start With the Body Hook
The body hook teaches the same mechanics with less reach. You bend the knees, stay compact, and keep the punch short.
It also lowers the chance of clashing heads in sparring when beginners crowd each other.
Start with the body. Build the line. Then aim higher when the motion is stable.
FAQs
How to throw a hook in boxing?
Start in guard, pivot the foot, turn the hip, then let the fist follow. Keep the elbow level with the fist, wrist straight, chin tucked, and other hand at your cheek. Snap the punch back to guard right after contact.
How to throw a left hook in boxing?
For an orthodox boxer, the left hook is the lead hook. Pivot on the ball of the lead foot, turn the lead hip, and keep the elbow and fist on one line. Do not drop the right hand while throwing it.
How to throw a proper hook in boxing?
A proper hook comes from rotation, not arm strength. The foot turns first, the hip drives the punch, and the arm stays compact. Land with a straight wrist and balanced stance. If you fall forward, the hook is too wide or too forced.
How to throw a right hook in boxing?
For an orthodox boxer, the right hook is the rear hook. Load slightly into the rear leg, pivot the rear foot, rotate the hip, and throw the punch in a tight arc. Keep your left hand high and reset fast after the shot.
Summing Up
A good hook is simple, but don’t be careless. Pivot the foot. Turn the hip. Keep the wrist straight. Bring the hand back to guard.
That is the whole punch.
Do not chase power before you own the shape. Most beginners hurt their wrists because they swing from the shoulder, reach for the bag, or let the fist land with a bent wrist. Fix the line first. Then add speed and power.
Start with short hooks to the body. They teach you to stay compact, keep balance, and hit without reaching. Film your shadowboxing once a week and run the checklist honestly. If the elbow flares, slow down. If the rear hand drops, reset. If the wrist bends, stop loading the punch.
Your goal is not to throw the biggest hook in the room, but to throw a hook you can repeat, defend after, and walk away from without wrist pain.
